💡 Looking for the legacy browser? Switch to the legacy version of this article.
The Page Vault Browser is a virtual browser hosted on our servers that lets you browse and capture web content just like you would with Chrome or Edge — log into websites, navigate through dynamic content, and preserve what's on your screen with just a few clicks. Because your browsing session runs on our servers (separate from your native browser), every capture is delivered as a high-quality, authenticated PDF with defendable metadata, helping maintain a clean chain of custody.
Step-by-Step Instructions
- Launch the Page Vault Browser from your Portal, click Open the Page Vault Browser to launch the tool.
- Navigate to Your Target Page

- Click the URL bar, enter the website address, and press Enter.
- The Page Vault Browser functions like any normal browser — you can click links, go back a page, or enter another URL as needed.
- Prepare the Page for Capture
- Close any pop-ups you don't want to include.
- Manually expand any "see more" sections or dropdowns you want to appear in the capture.
- Recommended: Use the "Auto-Scroll to Load Content" function before starting your capture. This loads in all of the page's content and prompts any remaining pop-ups to appear, so nothing is missed.
- Open capture options by selecting "Capture Page" beneath the URL
- Select a Folder
- The first time you use Capture Mode, you'll be required to choose a folder to save your capture.
- After the first capture, your last-used folder will pre-populate. Click the folder name to change or create a new one.
- The folder selection menu gives you an easy view into folders and their subfolders.
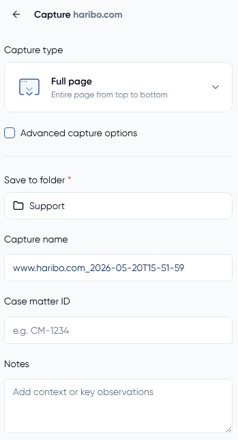
- (Optional) Customize Your Capture
- Capture Name: A default name is pre-filled, but you can rename it.
- Case Matter ID: If your organization requires a CMID, you'll be prompted to enter it.
- Notes: Add any notes you'd like. These appear in the Portal but not on the downloadable capture.
- Choose a Capture Type (explained here).
- Click "Capture"
- The capture status will display in the left-hand panel.
- Once complete, the capture will be available in your Page Vault Portal, ready to view and download.